🔹What are Services in K8s?
A Kubernetes Service is a mechanism to expose applications both internally and externally. Every service will create an everlasting IP address that can be used as a connector.
Additionally, it will open a port that will be linked with a targetPort. Some services can create ports in every Node, and even external IPs to create connectors outside the cluster.
With the combination of both IP and Port, we can create a way to uniquely identify an application.
Services come in several types:
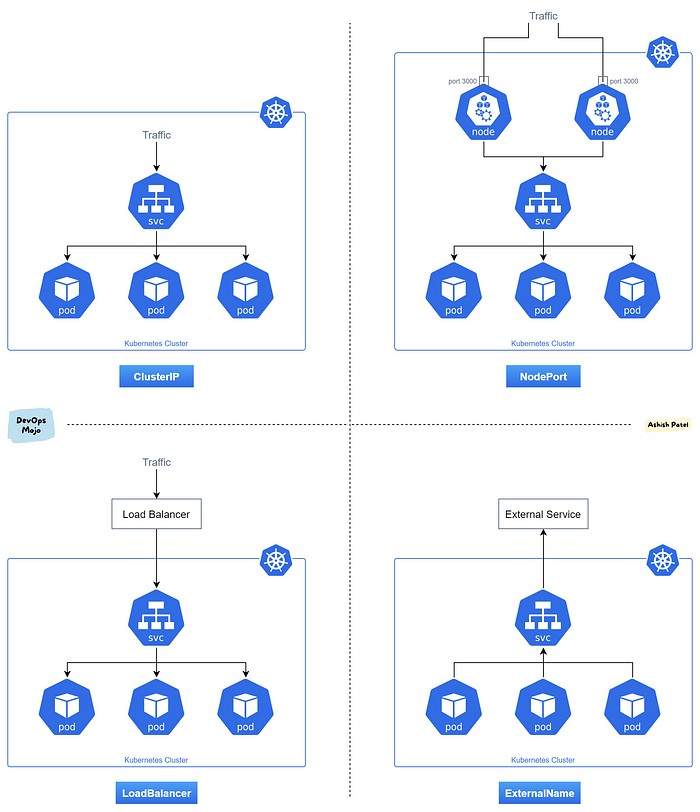
ClusterIP (default):
This is the default type for service in Kubernetes.
As indicated by its name, this is just an address that can be used inside the cluster. This creates a connection using an internal Cluster IP address and a Port. But, what if we need to use this connector from outside the Cluster? This IP is internal and won’t work outside.
This is where the rest of the services come in…
Nodeport:
A NodePort differs from the ClusterIP in the sense that it exposes a port in each Node. When a NodePort is created, kube-proxy exposes a port in the range 30000-32767.
The problem with using a NodePort is that you still need to access each of the Nodes separately.
LoadBalancer:
A LoadBalancer is a Kubernetes service that:
Creates a service like ClusterIP
Opens a port in every node like NodePort
Uses a LoadBalancer implementation from your cloud provider (your cloud provider needs to support this for LoadBalancers to work).
LoadBalancer services are typically used in cloud environments where they provision a load balancer to distribute traffic across multiple pods. This allows for external access to services.
ExternalName:
This service type maps a service to an external DNS name. It's used for accessing external services from within the cluster.
Services provide an essential layer of networking abstraction in Kubernetes, allowing applications to communicate reliably and consistently, regardless of where pods are located or how they are scaled.

Task 1: Create a Service for your todo-app Deployment
Create a Service definition YAML file: Begin by creating a YAML file named
service.ymlto define your Service for thetodo-appDeployment.
  apiVersion: v1
  kind: Service
  metadata:
    name: todo-app-deployment
    namespace: k8s-day34
  spec:
    type: NodePort
    selector:
      app: todo-app
    ports:
      - port: 80
        targetPort: 8000
Apply the Service definition: Execute the following command to apply the Service definition to your Kubernetes cluster.
Don't forget to replace
<namespace-name>with the actual namespace where yourtodo-appDeployment resides.kubectl apply -f service.yml -n <namespace-name>
Verification: To ensure that the Service is working correctly, access the
todo-appusing the Service's IP and Port within your specified Namespace.kubectl get svc -n <namespace-name>
Task 2: Create a ClusterIP Service for accessing the todo-app within the cluster
Create a ClusterIP Service definition YAML file: Now, create another YAML file named
cluster-ip-service.ymlto define a ClusterIP Service for yourtodo-appDeployment.apiVersion: v1 kind: Service metadata: name: todo-app-clusterip labels: app: todo-app spec: selector: app: todo-app ports: - protocol: TCP port: 8000 targetPort: 8080 type: ClusterIPApply the ClusterIP Service definition: Use the following command to apply the ClusterIP Service definition to your Kubernetes cluster within the specified namespace.
kubectl apply -f cluster-ip-service.yml -n <namespace-name>
Verification: To confirm that the ClusterIP Service is functioning correctly, access the
todo-appfrom another Pod within the cluster, still in your specified Namespace.Create a YAML file named
test-pod.ymlfor a testing pod:apiVersion: v1 kind: Pod metadata: name: test-pod spec: containers: - name: busybox image: busybox command: ['sh', '-c', 'while true; do wget -q -O- clusterip:8000; done']'Apply the ClusterIP Service definition to your K8s cluster using the command & verify todo-app is running
kubectl apply -f test-pod.yml -n <namespace-name>

Task 3: Create a LoadBalancer Service for accessing the todo-app from outside the cluster
Create a LoadBalancer Service definition YAML file: Create a YAML file named
load-balancer-service.ymlto define a LoadBalancer Service for yourtodo-appDeployment.w you can do it:
  apiVersion: v1
  kind: Service
  metadata:
    name: todo-app-loadbalancer
  spec:
    selector:
      app: todo-app
    ports:
      - protocol: TCP
        port: 80
        targetPort: 8000
    type: LoadBalancer
Apply the LoadBalancer Service definition: Apply the LoadBalancer Service definition to your Kubernetes cluster within the specified namespace using the following command:
kubectl apply -f load-balancer-service.yml -n <namespace-name>Verification: To verify the functionality of the LoadBalancer Service, access the
todo-appfrom outside the cluster, within your specified Namespace with the command:kubectl get svc -n <namespace-name>

#
